Tuesday, December 18, 2012

"Centsible Soups" Part 1- Chicken Sausage and Lentil Stew

Fall is the perfect time for soup. The weather is getting chilly and a warm bowl of healthy, filling soup is the perfect end to a good day around here. Not to mention it is easy to use with a crock-pot and not much makes me happier than easy meal prep and freezing left-overs from a doubled recipe to save for another day. Or if the hubs is 'lucky' he gets some leftovers the next day, too. 

I didn't make much soup while single because there was only one of me, and I didn't want to eat soup for days on end. Nick ate soup straight from a can, but we are committed to not doing that due to sodium levels, some completely crazy ingredients, and the BPA in the can. So, this is where this blog series comes in. I thought it would be lots of fun to try out several new soup recipes over the next several weeks, both vegetarian and non-vegetarian, those for the crock-pot and those for the stove top. Blogging about these successes and failures is a way to keep me accountable, to keep me trying new soups.

Lentil and Chicken Sausage Stew  

1 carton (32 oz) reduced-sodium chicken broth (or frozen homemade stock)
1 can (28 oz) diced tomatoes, undrained
3 fully cooked spicy chicken sausage links (3 oz each), cut into 1/2 in slices
1 cup dried lentils 
1 medium onion, chopped
1 medium carrot, chopped
1 celery rib, chopped
2 garlic cloves, minced
1/2 tsp dried thyme

Combine the ingredients in a 4-5 qt slow cooker. Cook on low for 8-10 hours or until lentils are tender.

Photo courtesy of simple-nourished-living.com


My thoughts? I would make it again, but I am hopeful that we find some we like even more. It seemed a tiny bit bland and Nick agreed. I think it is because I substituted the spicy chicken for turkey sausage instead (which does not go with my no foods with hydrogenated oils in them, but it is the last thing on hand). The turkey wasn't spicy, and I didn't add it until after work so the flavors weren't 'mixing' quite as long. I had never made a lentil stew or soup before and was pleased that I liked the taste and texture. These provide lots of healthy fiber! I did not add the celery since I didn't have any, and I used frozen cut carrots instead (just guessed on the amount). I also used frozen chopped onions from Kroger, so this meal was easy to prep. Open a few cans, snip a few bags, dump, measure, cut, and voila dinner at the end of the day! 

Original recipe from Taste of Home's Healthy Cooking Magazine Oct/Nov '11

Nutrition Facts: 
Serving Size: 1.5 cups
231 calories, 4 grams fat (1 gram saturated), 33 mg cholesterol, 803 mg sodium, 31 grams carbs, 13 grams fiber, 19 grams protein
Diabetic exchange: 2 lean meat, 2 vegetable, 1 starch


Friday, December 14, 2012

a little update... A BIG GOAL!

August 8th?! I knew we had been busy, but I had no idea we've been so busy that I haven't posted for over 4 months!! Here's the biggest highlights of the last few months... 

August: our friends from OH came in for the state fair so he could compete in a sheep-shearing contest. We so enjoyed our time with them. It's always an encouragement to spend time with like-minded kindred spirits. 

September: started teaching part-time, my birthday- Nick took the day off and made it super special!

October: Our one-year anniversary! How crazy is that!? God was sooo good to give me this man!

November: New roof. I'd been praying for hail so we could get a free roof thanks to insurance and God answered those prayers. For us a new roof also meant painting the house a new color- loooots of work!

December: Christmas is coming! I've had my shopping done since November. It helps that I'm making all our gifts this year in order to save money. We had a good friend pass away who was N's adopted grandma. We made a quick trip to Louisville for that and were able to see some good friends and their new baby.


We've been trying to save like it's our J-O-B. We've been cutting some expenses and this month have decided to spend next to nothing apart from our utilities, mortgage, and food (even that was lowered this month when I realized how much I have in the freezer). We've decided this is a good exercise in being content and in being frugal since we are still trying to save toward a specific goal... We were inspired by this blog post on a no-spend month. I think we're going to try to have them a bit more often. Hard when you're trying to decorate a new house, but so worth it when you have a big goal in mind.

Big goal??

I've picked up some daytime babysitting jobs and the latest adventure is opening an Etsy shop. I know people talk all the time about not having any luck with theirs. Honestly, I'm not trying to use it to make crazy, big bucks. Rather, we are using any funds, along with whatever else I make from teaching, babysitting etc to put towards adopting. We knew when we got married that we both had wanted to adopt for several years. We figured we would wait for several after marriage, but the Lord seems to be directing us to pursue this sooner than later. With the cost of an international adoption averaging 35k for one child we have decided we need to be saving and earning as much as we can.

We don't know when we would come home with a child. Adoption is TONS of work, paperwork, paperwork, and more paperwork. We also know we want to do this without debt, so it may take longer than we would like to have a decent amount towards this goal. 

Please consider checking out my Etsy shop. I don't have much up yet, but you can bookmark it and come back later as more will definitely be added. You can spread the word that this is going directly toward adoption (straight into its own separate account at a separate bank than the rest of our banking) which will encourage others to stop by. This is not about making money for the sake of money, but really trying to get one step closer to giving a child, a child of our hearts, a home.

My favorite item up now would make a simple and fun baby gift even. Check it out at my Etsy shop, ChildoftheHeart.


Wednesday, August 8, 2012

Budgets, Finances, and Sacrifice

Budgeting is one of those things that we have a love/hate relationship with. We created a budget based on Nick's income before we were even married. We met at Panera one afternoon and sat down with calculators, bills, paystubs and Dave Ramsey's free budget tool to create a zero-based budget. There were headaches, tears, and some needed laughter to relief stress. Money seems to have the power like none other to cause stress and mess with emotions.

As we have been married a whopping 10 months, money has continued to be a source of blessing and a source of occasional angst. Our budget has been re-vamped multiple times through new benefits, new deductions, renting to owning... each time it seems to be a bit easier, but no more loved.

Nick and I use an Excel worksheet that he created (I married one smart man!), and I try to enter every single purchase. Tedious? Yes. Sometimes obnoxious? Yes! Worth it? YES! It causes me to pause before I buy that pair of shoes that I simply 'love' or those new fixtures for updating the bathroom. Honestly, it can hurt at times. Learning the art of depriving myself for the good of myself/us/future kiddos is painful. I look at that budget and see places I wish there was more money or even ways to be saving more for the future, but then I am reminded of God's goodness and Nick's care.

We are a one income family. (I work part-time, but we put that money aside for the future.) It doesn't make much sense to most people. We are young and don't have kids. I loved teaching full-time, BUT Nick and I decided that at this time our marriage was worth this sacrifice. I recognize that I am blessed with a man who desires me to make the home and our marriage a top priority. With our relationship and marriage being more important that having extra money we find it super helpful to be intentional about how we spend our money. We HAVE to budget!

Why I love budgets:

It allows for freedom! Money can enslave you if you let spending or debts get out of control.
 
It allows you to save money for things you really desire or need down the road.

It insures that you are on the same page with your spouse i.e. no one partner is spending thousands of dollars on boating expenses when you can barely pay your utilities.

It allows you to see how well you really can live on one income or what you may think of as not enough even with two incomes. 

It shows you how to give sacrificially.

It helps you see where to cut back.

It opens your eyes to how much emphasis is put on material goods in your household.

It helps you set goals for the long-term and is extra rewarding when those goals are met.

Resources on budgeting:

Money and Marriage God's Way by Howard Dayton, Crown Financial Ministries.

Mint.com Nick and I are old-fashioned and like using our worksheet, so that the world wide web doesn't have all our information. I've also found that entering things in myself makes me that much more aware and conscious of when I am spending money too freely.

Crown Financial Ministries Spending Plan Tool  This is very similar to the free tool Dave Ramsey offers that helped us create our first budget as a couple.

The Total Money Makeover by Dave Ramsey  A book that gives helpful information in how to knock out debt, set-up an emergency fund, and plan for the future.


Tuesday, July 24, 2012

Gak-licious?

Hooooot, dry summer days call for some fun, inside activities to keep three kiddos happy and make for some great memories this summer.

I cannot say enough how much I LOVE spending times with these three kiddos. They've been a fun part of my life for several years now, so it is a super sweet treat to be able to hang out with them one day a week this summer.

I love having an excuse to see and act like a big kid with them. When I found this recipe for gak I knew immediately that we needed to do this. We tripled the following recipe so they each had a batch, but they could have been just as happy with a third of what they had.

Gather up these supplies:
2 bottles white glue (4 oz each)
Food coloring (I used neon gel colors)
1 tsp Borax (Our local Wal-Mart didn't have it, so my amazing hubby picked some up at Marsh. If you're local, I will totally give you a tsp. or more of Borax so you don't have to buy your own.)
Plastic cup or bowl

Empty bottles of glue into small container. (We used plastic cups for this step, too). Fill the glue bottles with water. Shake. Empty into the small container.

In a separate plastic cup or bowl, mix together 1/2 cup warm water with 1 tsp. Borax. Stir until Borax is dissolved.


Slowly add the Borax mixture to the glue. Add the food coloring quickly, too. I encouraged the kiddos to use no more than 1/2 of the tube. The pink was about 3/4 of the tube.


We didn't use our spoons for long because it firmed up quickly. I poured it onto the counter even when fairly runny and they began working with it using their hands.

 (The little guy was convinced it looked like mac and cheese. I had to tell him a couple of times not to put it near/in his mouth. Gak is simply not delicious!)

The shrieks and amazement at first touch were well worth the mess (and ruined shirt) we made! Have to love activities that provide a good amount of entertainment.


 The orange dog the littlest one made.


Ziploc bags work well to hold the gak when done. Just be sure and get the air out and save it to play with it another day.


We enjoyed this recipe courtesy of a post at Brown Paper Packages.

Tuesday, July 17, 2012

Alternative drying rack?

Where is your clean laundry right now? 

In the basket?
In the dryer?
On the floor?
On the bed?
On the couch?

Or do you put it away?

Before being put away my laundry can often be found in the... shower!

No, I don't rinse my laundry in the shower... I pinch pennies by DRYING it in the shower.

When living on my own I had a dryer that didn't seem to work well at all. Rather than spend money by running it, I decided to 'line dry' my laundry inside. It still comes in handy with the stuff that was supposed to skip the dryer anyway, the jeans that make the dryer run nonstop, or during a heat wave when you don't want to run any more appliances than necessary. 

All you need is an extra shower rod (you can get these for under $7 at your neighborhood store). Put it up in the back of the shower, but far enough away from the wall that your laundry has some air flow between it and the wall. Hang up your wet laundry and walk away. It can dry in an hour or all day/overnight depending on the fabric and the temperature of your home.

If you want to keep it hidden from guests who are coming over, hang it up on the back rod, close the curtain, and then walk away.

OR...

If you're like me and realize that is a risk worth taking, you can leave your curtain pushed back and hang clothes on the rod your shower curtain is on, too.


I really want a clothes umbrella outside. However, we are on this lovely thing called a budget, and that is not top priority. I rather like using my shower rod line for drying clothes as an alternative.

Just wait till you find out where I keep my dirty clothes before washing...

Thursday, July 12, 2012

Crockpot Hawaiian Chicken...

I love my crockpot for those days when I don't feel like cooking, standing over a hot stove, turning on a hot oven in this crazy heat we've been having, or for those days I know I won't be home. So, when I found a recipe for the crockpot using only three ingredients I was pretty excited to say the least!

Crockpot Hawaiian Chicken
4-6 chicken breasts
1 can pineapple tidbits
1 bottle bbq sauce (I use Bullseye because they have some varieties without high fructose corn syrup.)

Put chicken in crockpot and cover with bbq sauce and pineapple. Cook on low for 6 hours or high for 3 hours. Serve over rice. (We chose not because neither one of us was really all that hungry.)

I stuck it in the crockpot and walked out the door at about 6:45. Nick arrived home about 3:15 and turned it off. Obviously, the chicken cooked longer than 6 hours, but I figured it wouldn't hurt too much... I doubt it is the reason why, but both of us said we would pass on making it again. The chicken (a brand I normally use) was tough and chewy. I have another recipe for bbq chicken in the crockpot we like better that we'll stick with (and that I'll post here sometime 'soon'). 

Looks good and worth you giving it a shot since everyone has different tastes, but I'm not highly suggesting this one.


Original source is no longer available for this one according to Pinterest.

Tuesday, July 10, 2012

Oodles of Fun With (Pool) Noodles...

These are hoooooot summer days. It's no fun being outside and being cooped up inside is just sometimes plain boring. So, in an effort to make some fun for the kiddos I get to hang out with one day a week (and for myself since I can still be a kid in sooo many ways) craftiness, projects, games etc have been happening in their kitchen.

The kiddos are spread in age from 6th, 4th, and 1st grade. The oldest are girls. The youngest a boy. So, coming up with a variety of activities all three will enjoy has involved a little more work than in the past when I've been able to spend time with them.

They really had fun with dollar store pool noodles, beads from around their house, and some extra packing tape left over from their recent move. I was expecting maybe 15 minutes of fun, largely for the boy, but I was pleasantly surprised when over an hour was spent thinking, planning, scheming, learning, and being creative during this activity.

I cut the noodles in half with a knife and they were off... 


The younger two had fun trying to race their marbles/beads down the noodle on the stairs. They added loops and mountains and tested different theories. Then they got a bit more creative and started cutting, taping, punching holes... just like their big sister whose creation looked a bit more elaborate... 


What you can't see in the pictures is that she added holes and had the marble traveling from the top all the way to the bottom of her creation. Talk about fancy pants. Reminded me of indoor recess days  and the game MouseTrap.


Total cost to me: $2.14
Totally worth over an hour of fun!


Friday, June 29, 2012

Oven Baked Zesty Ziti

Remember I mentioned Mr. Fantastik loves carbs? More specifically, he looooves anything with pasta, marinara sauce, and meat. After all, he does have some Italian blood running through those veins of his. So, when I found this recipe for baked ziti I decided to give it a go.

Then life happened. I spent all day organizing, unpacking, doing laundry... and suddenly I just wanted it to be a quick and simple throw in a pan and bake kind of meal, not a stand over the stove to make sure the pasta doesn't boil over kind of meal. 

So, taking the above recipe as my inspiration, I decided to make it my own version...

Ingredients

1 lb ground turkey, cooked
2.5 cups ziti pasta
1 can tomato sauce
1 jar spaghetti/pasta sauce
1 can petite diced tomatoes
1 tsp oregano
1 tsp garlic powder
1-1.5 tsp red pepper flakes (to your taste)
1 tsp onion flakes
1 cup water

 In an ungreased 9x13 pan add the meat, sauces, tomatoes, and spices. Stir to mix. 
Add in the ziti and water. Mix together. 
Bake uncovered at 375 degrees for 40-50 minutes or until pasta is done.
Sprinkle with shredded mozzarella or Italian mix cheese to taste. 


I loved being able to throw this together in a hurry and not having to stand over the stove watching the pasta to be sure it didn't boil over! I may try it some day when I have more time and energy and then shorten the cook time, but we are definitely going to be using this again for a simple, throw in the oven and be done dinner.

As with any of the recipes I post, let me know your thoughts if you give this a try!

Monday, June 25, 2012

Oven Baked Chicken Fajitas

Scrumptious! The hubby spoke right up after his first bite and said to add this one to the rotation. I'm glad he said so because I was planning on it after I had a few bites. It is just that good (and healthy)! 

Ingredients

1 lb. boneless, skinless chicken breasts cut into strips (I used tenderloins and left them as is)
2 Tbsp vegetable oil (My preference is olive oil)
2 tsp chili powder
2 tsp cumin
1/2 tsp garlic powder
1/2 tsp dried oregano
1/4 tsp salt (I omitted this and would again)
1 (15 oz) can diced tomatoes with green chilies
1 medium onion, sliced
1 large bell pepper, sliced (I used a mix of red, orange, and yellow)
Flour tortillas
Toppings: i.e. cheese, sour cream or greek yogurt, guacomole, salsa

Preheat the oven to 400 degrees. Grease a 9x13 pan and place chicken in it. 
In a small bowl combine the oil and spices. 
Drizzle the mixture over the chicken. Stir to coat. 
Add the tomatoes, peppers, and onions. Stir. 
Bake, uncovered, for 25 minutes or until chicken is fully cooked
Serve on tortillas with desired toppings. 


N admitted he made his into more of a burrito after requesting rice. I was fine with this and served up some brown rice seasoned with cumin and garlic salt. Whatever keeps him happy!


Enjoy!
This recipe originated from Real Mom Kitchen

Friday, June 22, 2012

Fingernail Polish Remover... Who Knew??

I'm all about stretching pennies, making our money go as far as it can, in our one-income family. It's not uncommon for me to save the yogurt tubs, Cool-Whip containers, glass spaghetti sauce jars, or other containers that can be re-used to freeze things in, store leftovers, or for other types of organization around the house.

My new favorite has been the spaghetti sauce jars. I use Classico brand sauce and really like their jars. I've decided I'm going to re-use them for storing some of the mixes and seasonings I mix up. (I can't wait to try making my own taco seasoning!) I stick them through the dishwasher after peeling as much of the label off that I can and they come out cleaner, but with the glue film still on them. I've been on the hunt for something to remove it and heard that fingernail polish remover would do the trick.

Now, I'm not all about using a bunch of not-so-friendly chemicals for everyday use, but I wanted to test this out and see if it really worked.

I gathered my acetone-free remover, cotton balls, and the jar...


and when I was done, not even 5 minutes later...


Cannot wait to use these over and over again! I need to get crackin' on making some seasonings, mixes, but until then they work wonderfully as vases, too!

While I had the fingernail polish remover out, I decided to test another theory... I had read here that acetone from a beauty supply store will remove the print from your plastic containers. I had a hunch that the non-acetone fingernail polish would work, too. See for yourself...


Nick and I had a discussion on whether or not I would feel comfortable using these containers for food again. The verdict is still out, but we did read on the back of the bottle of the remover that it was harmful to plastics. I'll probably use this sparingly and even then maybe for other purposes besides freezing food.

Do you have any containers you like to re-use? Tips or tricks for making them prettified? Please share!

Wednesday, June 20, 2012

Eggless Blueberry Muffins

A little reading on replacing oil with greek yogurt inspired me to try some other substitutes in a batch of blueberry muffins for my man. 

I scoured the internet for some resources and found a variety of different food items that can be used to replace eggs. See a list of some here.

I decided to still use the greek yogurt to substitute the oil that was called for in this recipe. I used a little more than I would have needed, but figured it would help make them more moist.

My egg substitutes were flaxseed and a ripened banana. I wanted the health benefits of flaxseed and had the ripened banana on hand and thought a slight banana flavor with the blueberry might be good.

So, here is my take on eggless blueberry muffins.

1 box muffin mix
1 cup plain greek yogurt
1 ripened banana
1 Tbsp flaxseed
3 Tbsp water

In a small container mix the flaxseed and water. Beat with fork and allow to form a gel-like consistency. (Allowing it to sit while mixing everything else gave it time to become more gel-like.)

Peel the banana and mash to a puree. (1 small banana should be about a 1/4 cup, this making it the perfect amount for an egg replacement.)

Mix muffin mix, greek yogurt, and banana in large bowl. Add flaxseed and water mix. Stir well until mixed. 


The mixture will be rather dense and springy, not the normal consistency for muffin batter. I found it easier to spoon the batter in to the muffin liners.

I baked the muffins per the directions on the box and then inserted toothpicks to check. Perfect!


Nick enjoyed them and thought they would have been good enough to share with some new neighbors. I wasn't sure if I wanted to hand out my latest experiment until I had fully decided. By the time I had fully decided they were gone. Oy!

They were not as fluffy as your normal muffin, but were a bit more dense and made for a good, protein filled breakfast thanks to the greek yogurt. I stored mine in the fridge and re-heated them when we wanted one.

Would I do it again? Sure, but I want to try some other possibilities, too. After all, experimenting is fun when you have a human guinea pig to try everything. ; )

Tuesday, June 19, 2012

Magical Carpet Cleaner? Or Not??

When we moved into the new house I was relieved the carpet was not in need of being replaced. Sure, there are a few areas that you can tell were more traveled than others, but nothing that warrants ripping it out and spending lots of money for a replacement.

We did have a few spots throughout the living area, and I thought I would take a carpet cleaner purchased at the store and treat them, hopefully getting them out. I was very pleasantly surprised to find a magic carpet cleaner recipe on Pinterest and figured I should give it a go before spending money on something with a bunch of chemicals.

"Magical" Carpet Cleaner

Wipe up any leftover spill if it is a new spill/stain.

Sprinkle it with cornstarch or baking soda and allow it to sit for 10 minutes. Vacuum.

Cleaner: 1 Tbsp clear dishwashing liquid, 1 Tbsp white vinegar, with 2 cups warm water.

Use a white or very light colored rag and sponge the area with the solution. Then blot it until the liquid is absorbed.

Use cold water to sponge it and blot dry again.


The small (less than a dime in size) light greyish spots looked like this after being treated. I honestly feel like the clean spot stands out and captures my eye more than most of the spots I treated.


So, the moral of this story is... Be sure to test in an inconspicuous area first! I had to learn this the hard way. If you use it, do sparingly on spots you think are really worth treating. Perhaps buy a rug (like I did) to cover the new spots so that you won't be constantly reminded and frustrated with yourself about making the old stains into new spots that stand out almost more. 

I am sure this has worked for several people as evidenced by all the comments on the post, but it just didn't cut it for me.

Saturday, June 16, 2012

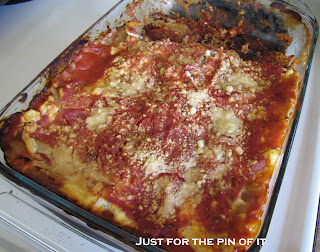
Lazy Day/Overnight Lasagna

So, Mr. Fantastik (yes, there is a reason for this name that I will have to share at some point) LOVES carbs! (Who doesn't, right?!) Breads, pasta, you name it, he loves it. I blame it on his runner metabolism. I, however, seem to gain about 20 pounds with one helping of spaghetti, so he doesn't get his pasta and marinara dishes near as often as he used to. That made serving up this easy lasagna a special treat for his birthday. 

The recipe in my recipe box (yes, I am old-fashioned and still have one of those) is handwritten by my sister, but I'm pretty sure she got it from a family friend. Regardless, it is easy to make the night before or morning of and stick in the fridge. When we get an extra freezer, I plan to freeze half the recipe when I make it.

Lazy Day, Overnight Lasagna

Ingredients: 
1 lb. ground beef or turkey
Ricotta Cheese (15 oz)
1 egg
1 Tbsp Oregano or Italian Seasoning
Lasagna (12 oz)
Spaghetti Sauce (32 oz)*
2 Tbsp Chopped Onion
2 Tbsp Parmesan Cheese
Shredded Mozzarella Cheese or Italian Cheese (to taste)

*I use more sauce than this (often close to 2 jars), and you will most likely want to as well. 


The recipe actually calls for sliced mozzarella cheese, but I prefer to just sprinkle some shredded cheese on top. I also use a spaghetti sauce that doesn't have sugar added or high fructose corn syrup. Classico Tomato & Basil or Onion & Garlic and a few select Meijer varieties are the only ones I have found with no sugar added. I chose whole wheat lasagna and a sweet onion.


Brown your meat and drain all that fat. I chose a leaner ground turkey. Add the spaghetti sauce and simmer for a few minutes. (This skillet is affectionately called 'the happy skillet' because it is just so much brighter and cheerier than my stainless steel skillets.)


Spread a layer of meat and sauce mix on the bottom of a 9x13 dish. Cover with lasagna noodles. Mix together ricotta cheese, onion, egg, and oregano. Cover noodles with half of the cheese mixture (thinner than shown). Sprinkle mozzarella cheese on top. I normally do a light sprinkling, but I know there are probably some cheese lovers out there! 

Repeat the layers. I normally have some extra sauce to the side and cover the last layer with a very thin amount of the sauce and the parmesan cheese. Remember you can refrigerate this overnight or all day.


 Bake at 350 for 50-60 minutes then enjoy, like we had before this picture was even taken. Ha!


Thursday, June 14, 2012

Birthdays and Berry Cobbler

We celebrated Nick's 29th birthday yesterday! Whooooo-eeeee am I ever getting old, being married to someone 29! Ha!

We didn't do anything crazy fancy-schmancy pants because we have been INSANELY busy over the last several weeks. Think weddings, acquiring new furniture, house projects, weddings, house guests, house projects, family obligations, fellowship obligations, unpacking, and more unpacking... we are ready for a vacation and decided a quiet night in was much more of our speed this year (I told you we are getting O-L-D!)

Nick has never been much of a cake person, but loves fruit crisps and cobblers. So, I decided what better time to test a Pinterest inspired recipe for cobbler than for his birthday.

I used one bag of mixed berry fruit, threw in some extra blueberries and strawberries, a french vanilla cake mix instead of white and just measured out 12 oz of Sierra Mist from the 2-liter. I don't like to keep pop in the house, so I opted to not buy the cans and just get a 2-liter for under a $1. This way it is no big loss if part of it is tossed. 


So, grab the 3-4 simple ingredients, pre-heat the oven to 350, and throw it together!

Berry Cobbler

Ingredients: 
2 bags of frozen berries (12 oz) You pick the variety. 
1 can Diet 7-Up, Sprite, or Sierra Mist
1 white cake mix

Directions: 
Put frozen fruit in a 9 x 13 pan. 
Sprinkle with cake mix. Do not mix. 
Slowly pour 7-Up over the top. Do not mix. 

Bake at 350 for 45-50 minutes. 

As you can tell from the photo below, some of my mix did not get wet from the Sierra Mist and came out a bit powdery still. I took a spoon and poked it down into the cobbler as soon as it came out of the oven.


The cobbler was delicious! I was never much of a cobbler or fruit pie girl until recent years. I have slowly been acquiring the taste, but I will tell you a secret I'm not so proud of... I went back for seconds. Shhhhhh!!

I hope you give this a try! It really was good and no one would believe it was as simple as pouring a few ingredients into a dish. Go visit the blog the pin came from, Living a Changed Life, as she has lots of yummy tips and other tricks on weight loss and being active.

We paired it with Nick's favorite dinner dish of lasagna. (I didn't tell you we had a HEALTHY dinner in!) I have a favorite, easy recipe I will have to share for that soon.


Wednesday, June 13, 2012

Just for the Fun of It

Oh, Pinterest! Whatever did I do before there was you? However did I do anything crafty, make a tasty treat, or upcycle something so cute?

Truth is I have always loved crafty stuff. Organizational stuff. Re-using something. Trying a new recipe. Now inspiration is at my fingertips. And my fingertips spend several hours pinning lots and lots of different things. I blame it on being a newlywed and a new homeowner. I mean, come on, I suddenly have an excuse to do this all, right? Uh.... (I think Mr. Fantastik is secretly scared I am going to spend all our hard-earned cash, but there are pins on saving money and being frugal, right? Riiiiggghhht.)

As I hit that little red button when I first started pinning, I questioned myself on whether or not I would ever use that hint, tip, craft skill, or recipe. So, I started a board of pins I have tried. I wrote under them how it worked, what I changed, if I would use that pin again. Problem is I forget that I have tried them and forget to repin them to the 'Pins I've Tried' board. Before long my brain started spinning... What if I were to create a blog, an outlet for what I have tried, projects that may not have come directly from Pinterest, but might be inspired by it, or projects you could find on Pinterest?

That is exactly what I am going to do- I am going to be trying my hand at blogging about the pins I try, at other projects I dream up, everyday cleaning and organizing or even just everyday life in our new household.

Now I'm off to pin some more... just for the 'fun' of it.