Friday, June 29, 2012

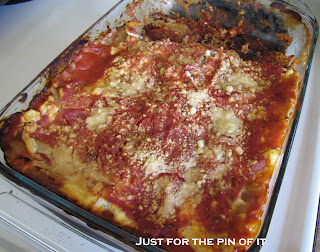
Oven Baked Zesty Ziti

Remember I mentioned Mr. Fantastik loves carbs? More specifically, he looooves anything with pasta, marinara sauce, and meat. After all, he does have some Italian blood running through those veins of his. So, when I found this recipe for baked ziti I decided to give it a go.

Then life happened. I spent all day organizing, unpacking, doing laundry... and suddenly I just wanted it to be a quick and simple throw in a pan and bake kind of meal, not a stand over the stove to make sure the pasta doesn't boil over kind of meal. 

So, taking the above recipe as my inspiration, I decided to make it my own version...

Ingredients

1 lb ground turkey, cooked
2.5 cups ziti pasta
1 can tomato sauce
1 jar spaghetti/pasta sauce
1 can petite diced tomatoes
1 tsp oregano
1 tsp garlic powder
1-1.5 tsp red pepper flakes (to your taste)
1 tsp onion flakes
1 cup water

 In an ungreased 9x13 pan add the meat, sauces, tomatoes, and spices. Stir to mix. 
Add in the ziti and water. Mix together. 
Bake uncovered at 375 degrees for 40-50 minutes or until pasta is done.
Sprinkle with shredded mozzarella or Italian mix cheese to taste. 


I loved being able to throw this together in a hurry and not having to stand over the stove watching the pasta to be sure it didn't boil over! I may try it some day when I have more time and energy and then shorten the cook time, but we are definitely going to be using this again for a simple, throw in the oven and be done dinner.

As with any of the recipes I post, let me know your thoughts if you give this a try!

Monday, June 25, 2012

Oven Baked Chicken Fajitas

Scrumptious! The hubby spoke right up after his first bite and said to add this one to the rotation. I'm glad he said so because I was planning on it after I had a few bites. It is just that good (and healthy)! 

Ingredients

1 lb. boneless, skinless chicken breasts cut into strips (I used tenderloins and left them as is)
2 Tbsp vegetable oil (My preference is olive oil)
2 tsp chili powder
2 tsp cumin
1/2 tsp garlic powder
1/2 tsp dried oregano
1/4 tsp salt (I omitted this and would again)
1 (15 oz) can diced tomatoes with green chilies
1 medium onion, sliced
1 large bell pepper, sliced (I used a mix of red, orange, and yellow)
Flour tortillas
Toppings: i.e. cheese, sour cream or greek yogurt, guacomole, salsa

Preheat the oven to 400 degrees. Grease a 9x13 pan and place chicken in it. 
In a small bowl combine the oil and spices. 
Drizzle the mixture over the chicken. Stir to coat. 
Add the tomatoes, peppers, and onions. Stir. 
Bake, uncovered, for 25 minutes or until chicken is fully cooked
Serve on tortillas with desired toppings. 


N admitted he made his into more of a burrito after requesting rice. I was fine with this and served up some brown rice seasoned with cumin and garlic salt. Whatever keeps him happy!


Enjoy!
This recipe originated from Real Mom Kitchen

Friday, June 22, 2012

Fingernail Polish Remover... Who Knew??

I'm all about stretching pennies, making our money go as far as it can, in our one-income family. It's not uncommon for me to save the yogurt tubs, Cool-Whip containers, glass spaghetti sauce jars, or other containers that can be re-used to freeze things in, store leftovers, or for other types of organization around the house.

My new favorite has been the spaghetti sauce jars. I use Classico brand sauce and really like their jars. I've decided I'm going to re-use them for storing some of the mixes and seasonings I mix up. (I can't wait to try making my own taco seasoning!) I stick them through the dishwasher after peeling as much of the label off that I can and they come out cleaner, but with the glue film still on them. I've been on the hunt for something to remove it and heard that fingernail polish remover would do the trick.

Now, I'm not all about using a bunch of not-so-friendly chemicals for everyday use, but I wanted to test this out and see if it really worked.

I gathered my acetone-free remover, cotton balls, and the jar...


and when I was done, not even 5 minutes later...


Cannot wait to use these over and over again! I need to get crackin' on making some seasonings, mixes, but until then they work wonderfully as vases, too!

While I had the fingernail polish remover out, I decided to test another theory... I had read here that acetone from a beauty supply store will remove the print from your plastic containers. I had a hunch that the non-acetone fingernail polish would work, too. See for yourself...


Nick and I had a discussion on whether or not I would feel comfortable using these containers for food again. The verdict is still out, but we did read on the back of the bottle of the remover that it was harmful to plastics. I'll probably use this sparingly and even then maybe for other purposes besides freezing food.

Do you have any containers you like to re-use? Tips or tricks for making them prettified? Please share!

Wednesday, June 20, 2012

Eggless Blueberry Muffins

A little reading on replacing oil with greek yogurt inspired me to try some other substitutes in a batch of blueberry muffins for my man. 

I scoured the internet for some resources and found a variety of different food items that can be used to replace eggs. See a list of some here.

I decided to still use the greek yogurt to substitute the oil that was called for in this recipe. I used a little more than I would have needed, but figured it would help make them more moist.

My egg substitutes were flaxseed and a ripened banana. I wanted the health benefits of flaxseed and had the ripened banana on hand and thought a slight banana flavor with the blueberry might be good.

So, here is my take on eggless blueberry muffins.

1 box muffin mix
1 cup plain greek yogurt
1 ripened banana
1 Tbsp flaxseed
3 Tbsp water

In a small container mix the flaxseed and water. Beat with fork and allow to form a gel-like consistency. (Allowing it to sit while mixing everything else gave it time to become more gel-like.)

Peel the banana and mash to a puree. (1 small banana should be about a 1/4 cup, this making it the perfect amount for an egg replacement.)

Mix muffin mix, greek yogurt, and banana in large bowl. Add flaxseed and water mix. Stir well until mixed. 


The mixture will be rather dense and springy, not the normal consistency for muffin batter. I found it easier to spoon the batter in to the muffin liners.

I baked the muffins per the directions on the box and then inserted toothpicks to check. Perfect!


Nick enjoyed them and thought they would have been good enough to share with some new neighbors. I wasn't sure if I wanted to hand out my latest experiment until I had fully decided. By the time I had fully decided they were gone. Oy!

They were not as fluffy as your normal muffin, but were a bit more dense and made for a good, protein filled breakfast thanks to the greek yogurt. I stored mine in the fridge and re-heated them when we wanted one.

Would I do it again? Sure, but I want to try some other possibilities, too. After all, experimenting is fun when you have a human guinea pig to try everything. ; )

Tuesday, June 19, 2012

Magical Carpet Cleaner? Or Not??

When we moved into the new house I was relieved the carpet was not in need of being replaced. Sure, there are a few areas that you can tell were more traveled than others, but nothing that warrants ripping it out and spending lots of money for a replacement.

We did have a few spots throughout the living area, and I thought I would take a carpet cleaner purchased at the store and treat them, hopefully getting them out. I was very pleasantly surprised to find a magic carpet cleaner recipe on Pinterest and figured I should give it a go before spending money on something with a bunch of chemicals.

"Magical" Carpet Cleaner

Wipe up any leftover spill if it is a new spill/stain.

Sprinkle it with cornstarch or baking soda and allow it to sit for 10 minutes. Vacuum.

Cleaner: 1 Tbsp clear dishwashing liquid, 1 Tbsp white vinegar, with 2 cups warm water.

Use a white or very light colored rag and sponge the area with the solution. Then blot it until the liquid is absorbed.

Use cold water to sponge it and blot dry again.


The small (less than a dime in size) light greyish spots looked like this after being treated. I honestly feel like the clean spot stands out and captures my eye more than most of the spots I treated.


So, the moral of this story is... Be sure to test in an inconspicuous area first! I had to learn this the hard way. If you use it, do sparingly on spots you think are really worth treating. Perhaps buy a rug (like I did) to cover the new spots so that you won't be constantly reminded and frustrated with yourself about making the old stains into new spots that stand out almost more. 

I am sure this has worked for several people as evidenced by all the comments on the post, but it just didn't cut it for me.

Saturday, June 16, 2012

Lazy Day/Overnight Lasagna

So, Mr. Fantastik (yes, there is a reason for this name that I will have to share at some point) LOVES carbs! (Who doesn't, right?!) Breads, pasta, you name it, he loves it. I blame it on his runner metabolism. I, however, seem to gain about 20 pounds with one helping of spaghetti, so he doesn't get his pasta and marinara dishes near as often as he used to. That made serving up this easy lasagna a special treat for his birthday. 

The recipe in my recipe box (yes, I am old-fashioned and still have one of those) is handwritten by my sister, but I'm pretty sure she got it from a family friend. Regardless, it is easy to make the night before or morning of and stick in the fridge. When we get an extra freezer, I plan to freeze half the recipe when I make it.

Lazy Day, Overnight Lasagna

Ingredients: 
1 lb. ground beef or turkey
Ricotta Cheese (15 oz)
1 egg
1 Tbsp Oregano or Italian Seasoning
Lasagna (12 oz)
Spaghetti Sauce (32 oz)*
2 Tbsp Chopped Onion
2 Tbsp Parmesan Cheese
Shredded Mozzarella Cheese or Italian Cheese (to taste)

*I use more sauce than this (often close to 2 jars), and you will most likely want to as well. 


The recipe actually calls for sliced mozzarella cheese, but I prefer to just sprinkle some shredded cheese on top. I also use a spaghetti sauce that doesn't have sugar added or high fructose corn syrup. Classico Tomato & Basil or Onion & Garlic and a few select Meijer varieties are the only ones I have found with no sugar added. I chose whole wheat lasagna and a sweet onion.


Brown your meat and drain all that fat. I chose a leaner ground turkey. Add the spaghetti sauce and simmer for a few minutes. (This skillet is affectionately called 'the happy skillet' because it is just so much brighter and cheerier than my stainless steel skillets.)


Spread a layer of meat and sauce mix on the bottom of a 9x13 dish. Cover with lasagna noodles. Mix together ricotta cheese, onion, egg, and oregano. Cover noodles with half of the cheese mixture (thinner than shown). Sprinkle mozzarella cheese on top. I normally do a light sprinkling, but I know there are probably some cheese lovers out there! 

Repeat the layers. I normally have some extra sauce to the side and cover the last layer with a very thin amount of the sauce and the parmesan cheese. Remember you can refrigerate this overnight or all day.


 Bake at 350 for 50-60 minutes then enjoy, like we had before this picture was even taken. Ha!


Thursday, June 14, 2012

Birthdays and Berry Cobbler

We celebrated Nick's 29th birthday yesterday! Whooooo-eeeee am I ever getting old, being married to someone 29! Ha!

We didn't do anything crazy fancy-schmancy pants because we have been INSANELY busy over the last several weeks. Think weddings, acquiring new furniture, house projects, weddings, house guests, house projects, family obligations, fellowship obligations, unpacking, and more unpacking... we are ready for a vacation and decided a quiet night in was much more of our speed this year (I told you we are getting O-L-D!)

Nick has never been much of a cake person, but loves fruit crisps and cobblers. So, I decided what better time to test a Pinterest inspired recipe for cobbler than for his birthday.

I used one bag of mixed berry fruit, threw in some extra blueberries and strawberries, a french vanilla cake mix instead of white and just measured out 12 oz of Sierra Mist from the 2-liter. I don't like to keep pop in the house, so I opted to not buy the cans and just get a 2-liter for under a $1. This way it is no big loss if part of it is tossed. 


So, grab the 3-4 simple ingredients, pre-heat the oven to 350, and throw it together!

Berry Cobbler

Ingredients: 
2 bags of frozen berries (12 oz) You pick the variety. 
1 can Diet 7-Up, Sprite, or Sierra Mist
1 white cake mix

Directions: 
Put frozen fruit in a 9 x 13 pan. 
Sprinkle with cake mix. Do not mix. 
Slowly pour 7-Up over the top. Do not mix. 

Bake at 350 for 45-50 minutes. 

As you can tell from the photo below, some of my mix did not get wet from the Sierra Mist and came out a bit powdery still. I took a spoon and poked it down into the cobbler as soon as it came out of the oven.


The cobbler was delicious! I was never much of a cobbler or fruit pie girl until recent years. I have slowly been acquiring the taste, but I will tell you a secret I'm not so proud of... I went back for seconds. Shhhhhh!!

I hope you give this a try! It really was good and no one would believe it was as simple as pouring a few ingredients into a dish. Go visit the blog the pin came from, Living a Changed Life, as she has lots of yummy tips and other tricks on weight loss and being active.

We paired it with Nick's favorite dinner dish of lasagna. (I didn't tell you we had a HEALTHY dinner in!) I have a favorite, easy recipe I will have to share for that soon.


Wednesday, June 13, 2012

Just for the Fun of It

Oh, Pinterest! Whatever did I do before there was you? However did I do anything crafty, make a tasty treat, or upcycle something so cute?

Truth is I have always loved crafty stuff. Organizational stuff. Re-using something. Trying a new recipe. Now inspiration is at my fingertips. And my fingertips spend several hours pinning lots and lots of different things. I blame it on being a newlywed and a new homeowner. I mean, come on, I suddenly have an excuse to do this all, right? Uh.... (I think Mr. Fantastik is secretly scared I am going to spend all our hard-earned cash, but there are pins on saving money and being frugal, right? Riiiiggghhht.)

As I hit that little red button when I first started pinning, I questioned myself on whether or not I would ever use that hint, tip, craft skill, or recipe. So, I started a board of pins I have tried. I wrote under them how it worked, what I changed, if I would use that pin again. Problem is I forget that I have tried them and forget to repin them to the 'Pins I've Tried' board. Before long my brain started spinning... What if I were to create a blog, an outlet for what I have tried, projects that may not have come directly from Pinterest, but might be inspired by it, or projects you could find on Pinterest?

That is exactly what I am going to do- I am going to be trying my hand at blogging about the pins I try, at other projects I dream up, everyday cleaning and organizing or even just everyday life in our new household.

Now I'm off to pin some more... just for the 'fun' of it.